Downloading and synchronising datasets
Table of contents
- Downloading and synchronising datasets
- Prerequisites
- Finding the dataset
- Downloading files
Prerequisites
Without taking some initial steps, data that other users share with you won’t be visible nor accessible. Data cannot be shared directly using the AWS S3 storage backend as access is provided through our system.
Ensure you have followed the below steps before attempting to download data from Provena’s data store.
Appropriate access
To download dataset files, two access types are required:
- Role level access: you must have read access to the Entity Registry - see requesting access for information on how to request access.
- Resource role access: datasets are registered resources in the Registry - downloading dataset files requires the ‘Dataset Data Read’ role. For more information about access control for registered entities, see access control.
AWS CLI installation
Downloading data is possible using only the AWS web console, however the features are very limited (in particular, you can only download one file at a time). We recommend and will focus on supporting the usage of the AWS CLI v2. Instructions on how to install this easy to use tool are available here.
Finding the dataset
In order to download a dataset, you must first identify it in the system. Once you reach the listing for that dataset in the data store, tailored instructions on how to download that dataset will be generated for you, making downloading a very quick process.
Using the registry
Once you open the data store and log in, you can navigate to datasets using the banner at the top and use the listing, filtering and searching functionality to locate the desired dataset to download. Select the dataset you wish to view and download from the list. See viewing a dataset for instructions on how to find a dataset.
Using a shared link
The persistent identifier generated when a dataset is minted can be shared in a special form to enable one click persistent navigation to that dataset. If someone shares a Provena data store link with you, you will be navigated to the registry entry for the dataset. Clicking on the View in Data Store button will display the dataset in the Data Store. You can follow on with the instructions below once you have reached the dataset listing.
Downloading files
Once you select the dataset you want to download, you can click the entry and you will be redirected to a view of the dataset. This view shows tabs including overview, details, download data, upload data and settings. After using the overview and/or details section to view information about the dataset, you can choose the download data option and then click the request credentials button.
Once your temporary credentials have been generated, three options to explore and download files will become available. Each are described below.
Using the built-in explorer to discover, download and share files (GUI)
Info! Using the built-in file explorer allows you to rapidly explore the contents of a dataset, download individual files in your browser and share files. It is not recommended for downloading a large amount of data, either through many small files, or fewer large files.
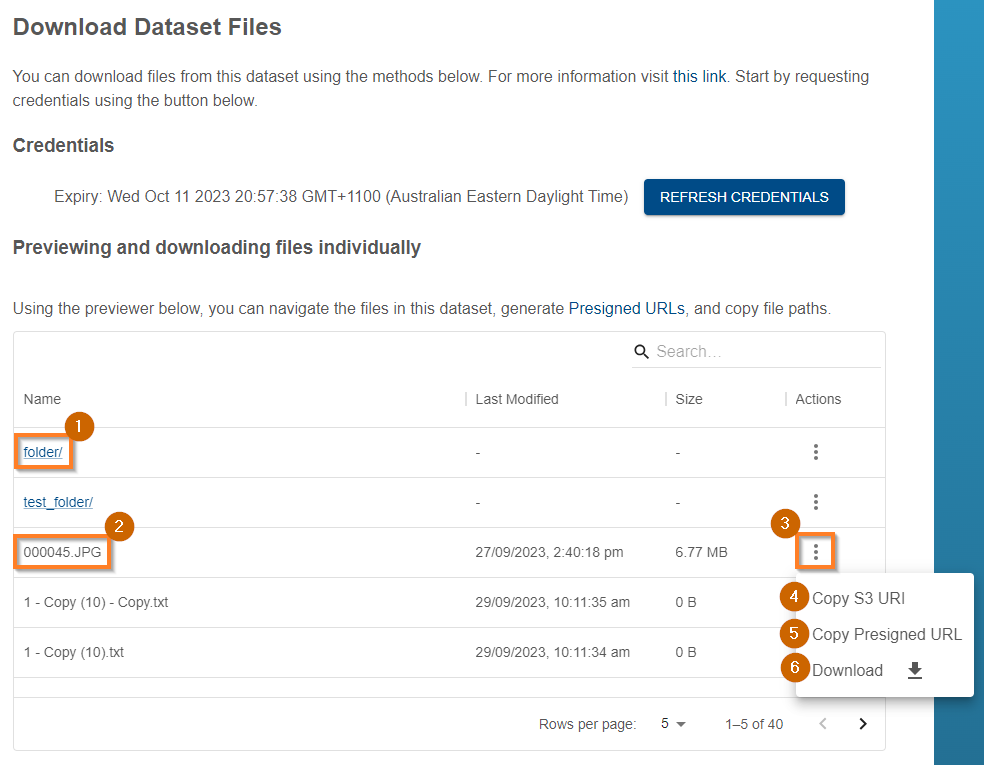
The Data Store now includes a built in explorer which you can use to rapidly explore the dataset files. After generating credentials, the below view will appear. To enter into a folder, click the folder name (1). If you are inside a folder, a parent folder entry “…” will appear, enabling you to return to the parent folder. If there are more than five entries, you may need to use the page controls in the lower right corner to traverse the pages.
All entries have a set of actions which can be performed (3). To perform an action, click on the entry in the list. Folders (1) support the following actions:
- Copy S3 URI (4): copies the full path of the file/folder to the system clipboard
Files (2) support additional actions:
- Copy Presigned URL (5): generates and copies to the clipboard a presigned URL (explained below) for this file
- Download (6): initiates a download of the file in the browser
| File Explorer |
|---|
 |
Presigned URLs
The storage service (AWS S3) used to store data files in Provena, supports the creation of temporary Presigned URLs. These URLs embed the authentication required to access a file within the URL. They have a fixed lifespan, defaulting to 3 hours. This can be used in a few ways:
Sharing Files
Using presigned URLs, you can easily share dataset files to others without needing them to sign-in and request access using Provena.
Warning! Please make sure you have the required permission to share the dataset with others. This could potentially result in data being available to users outside of the system.
Interfacing with other systems
Presigned URLs allow you to interface with other systems which expect a simple HTTP(s) URL to access a file. For example, you could generate a presigned URL for a geospatial file (e.g. a Cloud Optimised Geotiff), and use a GIS program such as QGIS to view it.
Using the Amazon S3 GUI to explore and download individual files (GUI)
Info! Using Amazon Web Services S3 console allows you to rapidly explore the contents of a dataset and download individual files in your browser. It is not recommended for downloading a large amount of data, either through many small files, or fewer large files.
To access the Amazon Web Services S3 console for your dataset files:
- Open the link or click the Click to open storage location button to login to the AWS system. You will be brought to your storage location automatically.
- You can now explore the dataset
- To download individual files, check the box next to the file name and click the orange Download button.
Downloading the entire dataset or many files (CLI)
Info! To download a large number of dataset files, or a large volume of data, we recommend using the AWS CLI. This method requires some additional setup, but remains simple to use and works for very large datasets.
Please note that you need to have the AWS CLI v2 installed to follow the below steps. For more information on how to prepare your system for CLI upload (and download), visit this guide.
To initiate CLI access to your dataset files:
- Your temporary read-only AWS programmatic access credentials will be shown. Choose the format that you require (Linux, Windows CMD or Windows Powershell) and click the click to copy button on the right hand side.
- Paste the credentials into your AWS CLI terminal environment, ensuring the pasted commands are executed
- Using the terminal, navigate to where you want the data to be downloaded to. Click on the click to copy button and paste into the terminal, remembering to change the name
folderto something meaningful for you. - You can use other AWS CLI commands to explore the directory or you can use the GUI to preview the datasets contents.
First time download (aws cp command)
If you have not downloaded this dataset before, you can use the provided AWS CLI commands to download the files.
Ensure that you create a new folder on your system, and navigate (using the terminal environment in which your AWS CLI tool is installed) to the location containing that folder. You will also need to use the Generate Credentials button in the data store to produce temporary access credentials. The data store provides the commands to set the required environment variables which enable access to the data. Be sure to choose the format which suits your terminal environment.
The data store provides a command ready to copy and paste - you will just need to change the name folder to suit the name of the folder you created.
If you have issues following these instructions, please don’t hesitate to contact the Provena team for more detailed assistance.
Updating local files from updated dataset (aws sync command)
The AWS CLI provides more than one option for copying data from a bucket to your local machine. The cp command above assumes that you don’t have any of the files on your local machine. The sync command will only download new files or files that have changed. This means that if only some of a dataset is updated, you don’t need to download it all again. For more information about how the sync command works, please see the official AWS documentation.
Info! Files that exist locally which have been removed from the dataset will not be deleted locally. To enable this optional behaviour, you can use the --delete flag. Please use with caution as improperly using this option (for example, if you are in the wrong working directory in your AWS CLI terminal environment) could cause significant damage to your local filesystem.
To use the sync operation, replace cp with sync in the generated copy command. Also remove the --recursive option. Remember you will need to have active AWS credentials to run this command. For example:
aws s3 sync s3://<provided path here> local_folder